Pages

Tuesday, September 30, 2014

OPI Get Cherried Away and KBShimmer Happily Ever Aster

Get Cherried Away was released by OPI as part of the limited edition Coca-Cola collection in late spring/early summer this year. It's a medium-dark lush purple creme with berried tones to it, almost but not quite a burgundy. There are similar colors out there that are not limited edition; OPI's Anti Bleak for one, although it appears to have just the tiniest touch more red in it. You can see an excellent swatch wheel comparison of these two on Paint Those Piggies, here. Another polish that's not quite as similar as Anti Bleak but still in the same family is Butter London's Queen Vic. Get Cherried Away is darker and more opaque than Queen Vic, and has more violet leanings while Queen Vic leans more red. You can see the comparison post I did of these two here. I'm sure there are others as well -- I think every brand should include this sort of berried purple/red-violet color in their line-up. It's a feminine purple with a gourmand sensibility to it, exuberant and dramatic enough to make a statement without being too edgy or in any way inappropriate for general consumption.

Get Cherried Away has a really nice formula. The consistency is fluid, creamy and smooth with an easy flow over the nail that makes it fun to apply. Pigmentation is excellent; in the right hands this polish could easily be a one coater. I used two coats, the second to finesse some lines on the first coat and to see if I could get this polish to level out and camouflage my furrowed nail beds. Got the lines straightened up for the most part but the camo was a no-go, as you will see. Cleanup was one of those deals where it's best to wait for the polish to set and dry a little before you go after any swipage lest the color from this well-pigmented puppy run and flood along the cuticle and sides of the nail. I wasn't careful enough with my cleanup and the photos show faint traces of pigment along a few of my cuticles, not so noticeable in person but the MACRO SEES ALL! Get Cherried Away dries naturally in average time to a glossy finish.

Photos show two coats of Get Cherried Away over treatment and basecoat. No topcoat, as I'm going to layer KBShimmer's lovely topper Happily Ever Aster over this polish. I generally always use a quick dry topcoat. It adds gloss, levels out imperfections, helps to camo the ridges, protects the polish while drying and ensures drying of all the layers. Get Cherried Away feels naked without it!


OPI Get Cherried Away


OPI Get Cherried Away


OPI Get Cherried Away


OPI Get Cherried Away


OPI Get Cherried Away


OPI Get Cherried Away


OPI Get Cherried Away

Wow! Such ridge! Very frown! Use topcoat nxt time!

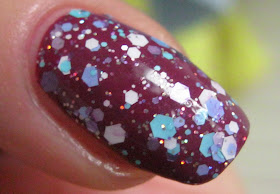
Happily Ever Aster was released by indie polish maker KBShimmer as part of the Summer 2014 collection this past June. This was a great collection for glitter crellies and toppers. Happily Ever Aster is one of the toppers, with a clear suspension base carrying abundant assorted glitters in a gentle floral-inspired mix: variously sized matte hexes in sky blue, lavender, aqua and white with small iridescent lavender hexes and tiny silver holo hexes. It's like a fairy-sized pastel pansy garden for your nails, complete with a magical sprinkling of rainbow sparks! So sweet and cheerful!

Application over Get Cherried Away was great. Happily Ever Aster's suspension base has a nice fluid quality that makes it easy to disperse the components using the plosh and spread or dabbing method. Glitter payoff is perfect with just the right amount of random glitters available in each brushful -- enough to cover most of your nail without overwhelming the base color. I used a few extra random dabs on some bare spots but otherwise did no special glitter placement. It kind of shows, too... I mean, maybe its just my pathological self-criticism but I just don't seem to have the most balanced touch when it comes to glitter toppers. I don't do them often enough, is what. I experienced a few tiny incidents of bleeding from Get Cherried Away onto the white glitters, but no problems otherwise. Happily Ever Aster dries naturally in good time to a shiny finish with a small amount of texture from the components.

Photos show one ploshed and spread coat of Happily Ever Aster over the Get Cherried Away manicure above with a topcoat of Seche Vite.


KBShimmer Happily Ever Aster over OPI Get Cherried Away


KBShimmer Happily Ever Aster over OPI Get Cherried Away


KBShimmer Happily Ever Aster over OPI Get Cherried Away


KBShimmer Happily Ever Aster over OPI Get Cherried Away


KBShimmer Happily Ever Aster over OPI Get Cherried Away


KBShimmer Happily Ever Aster over OPI Get Cherried Away


KBShimmer Happily Ever Aster over OPI Get Cherried Away


KBShimmer Happily Ever Aster over OPI Get Cherried Away


KBShimmer Happily Ever Aster over OPI Get Cherried Away

I've seen Happily Ever Aster over a number of different colors and while I'm happy with my effort here it isn't my favorite. The base is a little dark and strange next to the aqua glitters, especially, I think. My nails remind me of a herd of varicolored appaloosa ponies! Of the ones I've seen, my favorite combos with Happily Ever Aster would probably be The PolishAholic's over the medium cocoa brown of Essie Fierce No Fear, here, and Love for Lacquer's over the orchid purple of KBShimmer's own Radiant Orchid, here -- KellieGonzo used the same combo in her post, here. I also like it over KBShimmer's Pansy-Monium, which Valesha of Peachy Polish did in her post, here. And an honorable mention to ChitChatNails for her use of Happily Ever Aster in a gradient over bare nails, here

The combinations of topper to base are so much fun to look at and think about. I enjoy them so much it's a wonder I don't do more of this kind of polishing myself. I didn't expect to love Happily Ever Aster as much as I do. I knew I would like it but it's just such a lovely mixture of colors and applies so beautifully that my attraction to it has combined with a lot of well-won admiration and the two together, well, you know how it goes.

To those of you who venture fearlessly and often into the vast world of glitter toppers and put them together with carefully chosen base colors to charm and delight the eyes of the rest of us, I salute you!

love,
Liz

Monday, September 29, 2014

Elevation Polish Aiguilles d'Arves

I often feel at a distinct disadvantage when purchasing and reviewing creations from Elevation Polish because I don't speak any French at all beyond "hors d'oeuvre" and so many of Lulu's polishes have French names. I hate not knowing how to pronounce the name of a polish or a perfume! Luckily there are websites like Acapela Group where I can enter French text and hear it pronounced. Then I can render it phonetically in my own incorrect and idiosyncratic way for those of you who, like me, aren't versed in French pronunciation.

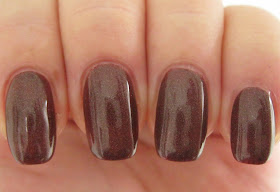
Aiguilles d'Arves (pronounced ā-GWEE deh-ARV-eh, or thereabouts) was released by indie polish maker Elevation Polish as part of the Fan collection for December 2013. Lulu describes this one as a "red based brown with near linear holographic pigment." I've seen many photos where Aiguilles d'Arves (funny how knowing how to pronounce it somehow makes it easier to type as well) takes that red and leans on it, reading as burgundy or even purple. But on me, to my eye, it reads as a rich brown with delicate hints of gold and claret. This polish contains finely milled SpectraFlair, a trademarked holographic pigment of distinctively high quality, and produces a beautifully defined prismatic display even on overcast days like today. SpectraFlair and other holo pigments, which read as silver on their own due to their aluminum base, will sometimes exert undue influence over color pigments and cause them to silver or grey out. But not here. The brown is saturated and earthy, albeit with an especially responsive and athletic prismatic display. 

Application was buttery awesome. The consistency of Aiguilles d'Arves is fluid, creamy and dense with a velvety, easy-to-control glide over the nail and excellent self-leveling properties. Pigmentation is also excellent. I believe that with a well-loaded brush and the proper mojo, this could be a one coater on short nails. I used two for this manicure. Cleanup is easy and straightforward with no trace of staining. Aiguilles d'Arves dries naturally in good time to a beautiful glossy finish.

Photos show two coats of Aiguilles d'Arves over treatment and basecoat with a slightly bubbly topcoat of Seche Vite.


Elevation Polish Aiguilles d'Arves


Elevation Polish Aiguilles d'Arves


Elevation Polish Aiguilles d'Arves


Elevation Polish Aiguilles d'Arves


Elevation Polish Aiguilles d'Arves


Elevation Polish Aiguilles d'Arves


Elevation Polish Aiguilles d'Arves


Elevation Polish Aiguilles d'Arves


Elevation Polish Aiguilles d'Arves


Elevation Polish Aiguilles d'Arves


Elevation Polish Aiguilles d'Arves


Elevation Polish Aiguilles d'Arves

The SpectraFlair is so active in indirect light that I can only imagine that the linear flare would be absolutely marvelous in the sun. I love how delicately balanced this brown is, a lovely creamy and understated color with just the right amount of warmth to it to be soft and flattering. You can see it waving at plum and burgundy, but the golden sheen beneath the color keeps it chocolaty. But after seeing so many photos where it did more than wave, I'm betting there's a hidden chameleon in this polish that allows it to pull closer depending upon the circumstances. I like where it's at on me this cool and cloudy day, though. It has a silky, cozy elegance than I'm enjoying very much.

If you're after a brown, which seems to be trending more strongly this fall than it has in a long while, this is a pretty one!

love,
Liz

Sunday, September 28, 2014

WingDust State of Dreaming

State of Dreaming is a recent release from Canadian indie polish maker WingDust Collections. Stephanie, the owner and creative force behind WingDust, describes this lovely glitter holo as having a blue-toned purple base and to my eye it is a perfect medium cornflower blue. Bearing medium and small sky blue and lilac satin hex glitters as well as small metallic sapphire blue hexes and I believe a scattering of tiny holo glitters, the base is infused with fine holographic pigment that nuances it with tones of violet and sky blue. The satin hexes have a soft glow punctuated with pinkish lilac and flashes of bright primary blue from the sapphire hexes producing a bouquet of blue lit with sparks of rainbow colors from the tiny holo glitters, the whole of which rests softly in the radiant blue holographic base. To me, State of Dreaming is a particularly atmospheric composition recalling the expansive blue bowl of a clear cloudless sky, lighter at the rim along the horizon and deepening to boundless cornflower overhead, with prismatic flares of light at the edge of vision when the sun strikes just so.

Ya think? *lol* It's a beauty, in any case, soothing and lighthearted with a great deal of sparkle in the sun.

Application was great! State of Dreaming has a slightly thicker consistency that is still fluid and easy to work with, and glides on smoothly over the nail. Glitter payoff is excellent, with a healthy sampling of random components delivered with each brushful. The glitters disperse effortlessly over the nail as you paint without tumbling or stacking. I did have a very few protruding glitters, but they were easily coaxed into position with the brush. Pigmentation is very good with wearably opaque coverage achieved in two coats, although I used three for the photos. Cleaning up after glitters is never without the random piece stuck here or there, but this polish applies so nicely I had very little to do. State of Dreaming dries naturally in average time to a smooth slightly flat finish with a tiny bit of texture from the components.

Photos show three coats of State of Dreaming over Seche Rebuild treatment and Pretty Serious All Your Base basecoat with a smoothing coat of Essie First Base followed by a topcoat of Seche Vite.


WingDust State of Dreaming


WingDust State of Dreaming


WingDust State of Dreaming


WingDust State of Dreaming


WingDust State of Dreaming


WingDust State of Dreaming


WingDust State of Dreaming


WingDust State of Dreaming


WingDust State of Dreaming


WingDust State of Dreaming


WingDust State of Dreaming


WingDust State of Dreaming


WingDust State of Dreaming

This polish really hits the spot for me today. The weather is finally cooler than it has been, with low humidity, a clear blue sky and random breezes that make the leaves sparkle in the longer rays of the sun as the northern hemisphere works toward its wintry tilt. It's a gorgeous reprieve from the unusual heat and humidity we've been having this September, and State of Dreaming feels perfectly suited to the fresh, cool breeziness of the day.

love,
Liz


Saturday, September 27, 2014

OPI DS Indulgence

DS Indulgence was released by OPI as one of two Designer Series (thus the DS) polishes for fall 2012. Officially described by OPI as a "radiant violet-red with a shimmering golden finish," this is one of those polishes that is more than the sum of its parts. It has a medium-dark sheer purpley red base that is absolutely packed with fine golden shimmers. The golden shimmers through the translucent reddish base produce something new and unexpected, a rich shimmering gilded paprika color that morphs from sunburnt burgundy to orange depending upon lighting and the complexion of the wearer. The finish is changeable also, appearing foily, metallic, or shimmery depending upon the circumstances. Googling images of this polish will show you the range it can achieve. On me, it tends to lean to an intense blood orange shimmer in bright light and a bright cherry red foily metallic with an orange flash under dim lighting. It's a joyful, festive color with the shimmer lending it a particularly glamorous aspect.

Application was sweet. DS Indulgence has a consistency that is fairly fluid but not thin or runny, with an easy, smooth flow over the nail. Pigmentation is very good. Fully opaque even coverage is achieved with two coats, but I used three to camo my ridges and found the additional coat brought greater sparkle and richer color. Cleanup is mostly a matter of chasing down the fine gold shimmers, which disperse across the skin at the touch of acetone and stick there like little golden limpets. DS Indulgence dries naturally in average time to a glossy finish. 

Photos show three coats of DS Indulgence over treatment and basecoat with a topcoat of Seche Vite.


OPI DS Indulgence


OPI DS Indulgence


OPI DS Indulgence


OPI DS Indulgence


OPI DS Indulgence


OPI DS Indulgence


OPI DS Indulgence


OPI DS Indulgence


OPI DS Indulgence


OPI DS Indulgence


OPI DS Indulgence

DS Indulgence has much more reddish and berry tones to it than the bottle color shows. When I opened the bottle I was quite surprised by the deep purpley fuchsia of the base even though I'd read about it beforehand. The photos show it looking very red now that I've uploaded them, and I guess you could call this shimmery spicy color a warm red or a flame red. Between its various appearance iterations it has most of the fire colors in there, even to the flying golden sparks. I think the shimmer size is what keeps this one so interesting and changeable; they are fine enough to affect the overall appearance but not so fine that they disappear into it. I love being able to see those shimmer particles on the nail!

love,
Liz