First thing's first! Darcy was released this past summer as part of Zoya's Stunning collection for summer 2013. It is a bright creamy buttercup yellow creme with a bit of secret yellow shimmer to it. This is the color that you would make the sun in your early crayon landscapes, and maybe add a smiley face to it because it is a happy sun.
Yellow isn't the best color for me as you will see but I really like this forthright honest beamer. I would have liked it even better had taken less than three coats to even out the coverage, but most all yellow polishes are reknowned for their streakiness so it isn't a question of being subpar. Streaks aside, the formula was light and liquid and I got it everywhere. Turns out I didn't do as thorough a clean up as I thought I did. Please try to overlook the winning way I included my cuticles in the paint job.
Photos show three coats of Darcy over treatment and basecoast with a topcoat of Seche Vite.
 |
| Zoya Darcy |
 |
| Zoya Darcy |
 |
| Zoya Darcy |
 |
| Zoya Darcy |
 |
| Zoya Darcy |
 |
| Zoya Darcy |
 |
| Zoya Darcy |
 |
| Zoya Darcy |
 |
| Zoya Darcy |
 |
| Zoya Darcy |
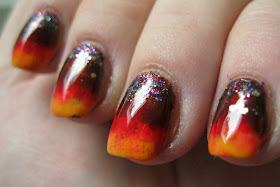
Using the Darcy manicure as a base, I created a gradient using the sponging technique. Fuzzy had picked up a leaf yesterday that was shed by the red maple in the front yard and I used that as my inspiration. The colors I used were OPI Nicole Shoot for the Maroon, Misa Bourbon on the Rocks, Zoya Livingston and Zoya Darcy. I sponged each color one at a time starting at the cuticle with Shoot for the Maroon. I made a little pool of color on a piece of tinfoil and dipping the tip of a small latex-type make-up sponge into the pool, sponged the color across all my nails before beginning with the next color. Once I had finished sponging, I did my clean up (such as it is) and applied a topcoat of Seche Vite to each nail.
Once that had dried, I added a tiny reverse glitter gradient beginning at the cuticle with Shimmer Polish Wendy. Another coat of Seche Vite and I was done.
It didn't turn out like I'd hoped at all but of course I learned a lot and realize that I must try more of these sponging manicures before I can even begin to know what to expect when I do it. There's more to getting it right than just dabbing color. Here are the pics....
 |
| polishes I used, l to r: Nicole by OPI Shoot for the Maroon, Misa Bourbon on the Rocks, Zoya Livingston, Zoya Darcy... |
 |
| ...and Shimmer Polish Wendy |
 | |
| fall gradient nail art fail |
 |
| fall gradient nail art fail |
 |
| fall gradient nail art fail |
 |
| fall gradient nail art fail |
 |
| fall gradient nail art fail |
 |
| fall gradient nail art fail |
 |
| fall gradient nail art fail |
 |
| fall gradient nail art fail |
 |
| fall gradient nail art fail |
*lol* Actually this manicure reminds me most of those reverse candy corns, you know the ones?
What I learned was: use a smaller bit of make-up sponge and dab more lightly and carefully (or I think I might try painting the polish on the sponge with the colors in stripes and do the whole nail at once that way), be more patient with the process, pick colors that have a similar finish. I also found it difficult to figure out how much of each color to sponge before quitting and moving to the next color. The clean up was tedious and I was kinda worn out afterwards! I think I may need a new and different clean up brush too.
This was my third go at sponging a gradient and while I know it's no beauty and doesn't compare to the wonderful creative manicures I've seen online using this technique, it was fun. At least, until I got to the photos. Ha! And Fuzzy liked it a lot. It was inspired by her leaf, so that makes me happy.
love,
Aunt Liz
No comments:
Post a Comment